
Gluten free Sourdough Bread
This gluten free sourdough bread is optimized for digestibility through the fermentation process, and is free of fillers. While a bit of a geeky process, it’s worth every bite: a perfect crust and a rich, slightly sweet crumb.
Ingredients
- 250 g whole rice sourdough starter
- 450 ml water
- 150 g oat flour gluten free
- 80 g white rice flour
- 30 g potato starch
- 60 g chestnut flour
- 2 tsp unrefined sea salt
- 150 g raisins and dried figs figs quartered
- 100 g sunflower seeds
- 60 g flax seeds crushed
- 100 g walnuts
- 20 g carob flour
- butter to grease the loaf pan
- gluten free oats to sprinkle the greased loaf pan
Instructions
- DAY 1:
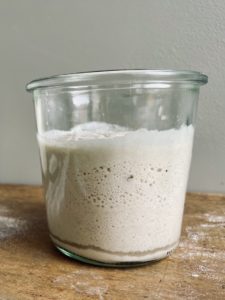
- Feed your sourdough starter twice to properly activate it and reach the volume of more than 1 cup.
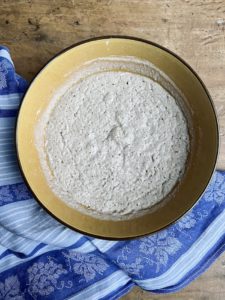
- Add sourdough starter, water, oat flour, rice flour, chestnut flour, potato starch and salt to a bowl. Mix well, cover with a wet tea towel, let rise over night.
- DAY 2:
- The dough should have significantly risen and formed bubbles on the surface.
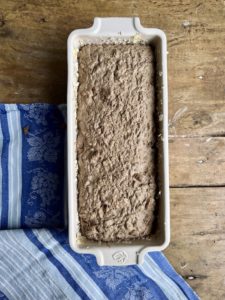
- Add raisins, sunflower seeds, flax seeds, walnuts and carob flour. Mix well.
- Grease a loaf pan of 30 cm with butter and sprinkle with gluten free oats.

- Carefully transfer the dough to the loaf pan.

- Let rise in a warm spot for another couple of hours or until the dough has risen more or less to the top of the tray.
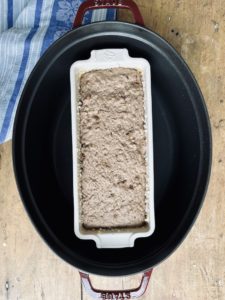
- Set the oven to 250 °C / 480 °F. Preheat a big enough Dutch oven (lid on) or bread baking pan for 30 min.
- Remove the Dutch from the oven and carefully place the loaf pan into the Dutch oven (keep on the oven gloves!).
- Bake the bread for 25 min, lid on.
- Take the lid off, turn the heat down to 200 °C / 390 °F degrees and bake for another 25 min.
- Let cool down for 10 min, then take the loaf pan out of the Dutch oven. Let cool down for another 10 min, then carefully flip the loaf pan upside down. The bread should come out easily. Let cool upside down on an oven rack.
Notes
This bread keeps well much longer than most of the gluten free breads I’ve tried so far. Depending on the temperature it’s best to store it in the fridge (in an airtight container) after a couple of days. I like to freeze a couple of portions of sliced pieces for later use, best toasted.